VRP Shopify Manual:
Intro:
Shopify is an ecommerce platform that allows our customers to sell their products online through an online web store presence. At VRP we offer an integration of data with the Shopify platform as an additional option to our customers. This allows our customers to automate the creation of products from any data they already have in VRP. It also allows customers a one stop shop of managing inventory, prices, images and other information as it pertains to products all through VRP without having to do the same work again on Shopify. In this manual I will explain the basics of getting the Shopify Integration up and running in order to have VRP share and update product information to the Shopify platform.
Initial Setup:
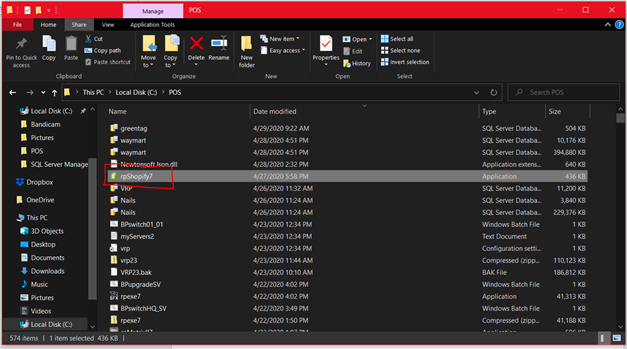
The first step to get the Shopify platform up and running is to install the module that we have that takes care of the synchronization between VRP and Shopify. The module is called RPShopify7.exe and is located within the Local Disk (C:) POS folder of each installation of VRP. Normally we recommend the software to run on the customer’s Server as most customers do not use the server as a workstation and the program can run uninterrupted. Below you will find the location of this folder and how the icon looks like of the application.
Once this file is located on the server, we can run the program for the first time, it will ask for the password to license the program and allow it to run. (Password must never be shared with any Customers). Once the program has the password and is open it will look something like this:
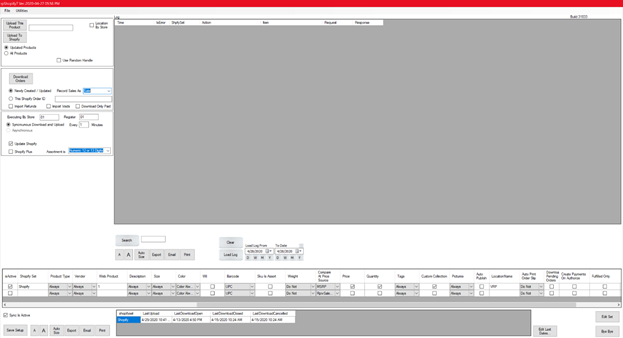
There are many settings on this screen which vary depending on what the customer would like to send from the VRP database to the site and how they want sales from the web to be imported into VRP. The main grid on the screen is what is know as the log. The log will update automatically on a set interval to fetch and send data to the site. If there are any errors on the log, we will see red lines on the grid meaning the program failed to fetch or send. This program should be running constantly on the computer for it to be up to date. We have an option to hide the program in the system tray and have it run in the background if we do not want it to show on the screen. We can do that by clicking on the “bye bye” button on the bottom right of the module screen.
Setting up a Shopify Private App and Link to VRP:
At this point we have launched the program and have it running on the screen. However, there is no connection to Shopify, so we need to create that connection through what Shopify gives us known as an API (Application Program Interface) key. This is Shopify’s way to communicate and allow VRP to access its data online. Assuming the Customer has an account already we will need to create this on the Shopify back end.
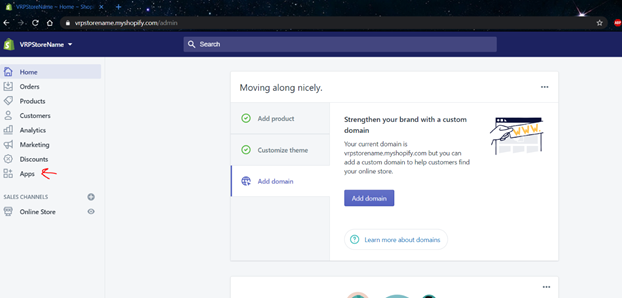
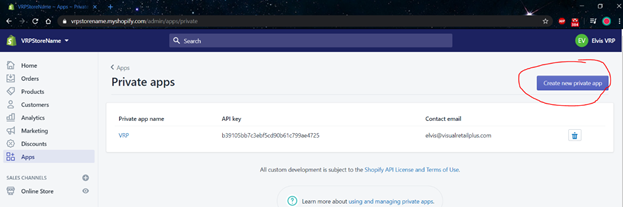
Once we have logged into the customers Shopify account, we will have to navigate to the Apps section>Manage Private apps>Create Private APP> set the API access settings> Create APP. This will create the private app and give us the fields we need in order to have RpShopify7.exe be able to send data over to their site. Below are some screenshots of this process.
Enter Apps Section:
Manage Private Apps Section:
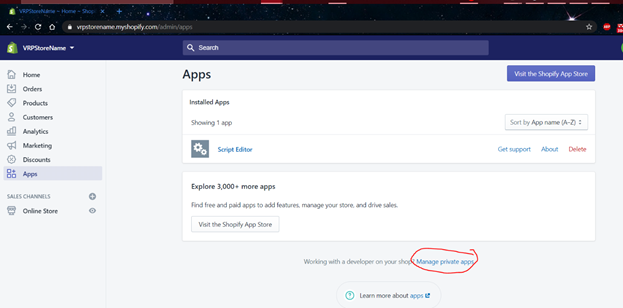
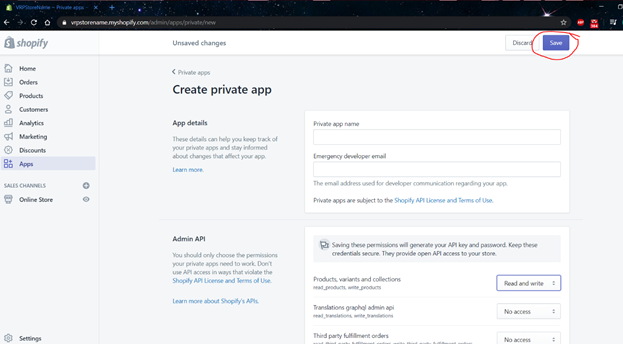
Create a New Private App (One was already created)
Set Read Write Permissions to products, inventory, sales, Orders (Needed by VRP for integration) Then Click Save to create app.
Once the App has been created, we will need to grab the
API key, API Password, and API Shared Secret as this must be plugged into the
RPShopify.exe Program.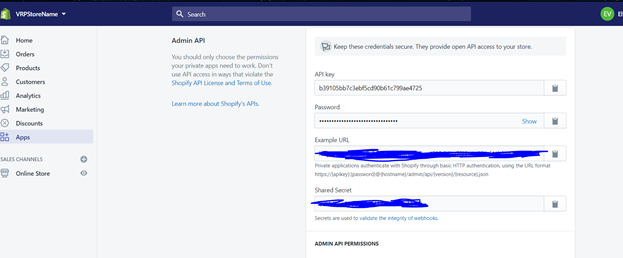
This can be added to the ShopifySets Table through that database. Although, it may be easier to open the edit sets Icon located on the bottom right above the “bye bye” button on the RpShopify.exe program and paste the three values into their respective fields, then click save.
Synchronization Settings:
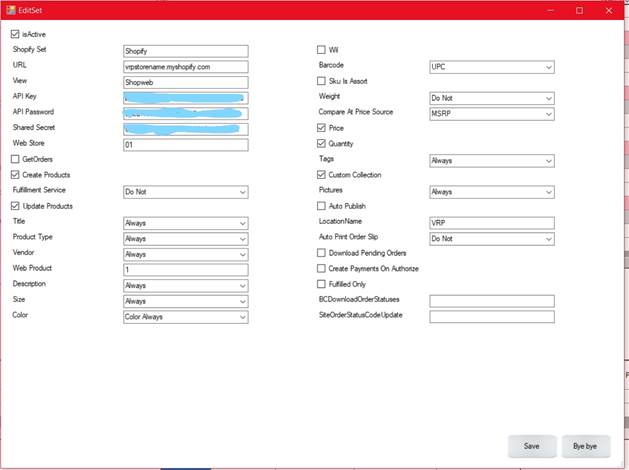
As shown above, the three values that have been painted light blue are where we will paste the credentials that Shopify gave us when creating the private app. While we are on this screen, we will also want to begin filling some other information on this form. As mentioned before this form updates data to a table called ShopifySets.
The Shopify sets are essential settings that filter what data is sent over and updated on the site. Any Fields that are checkboxes here are either 1 or 0 (send or do not send). Fields that have the drop down are fields that we can send one of three ways. “Always” (means whenever there is a change on VRP for the field this will also update the website), “On Creation”( sends the fields only the first time the product is going over to the website then will no longer update based on changes made in VRP), and Last is “Do Not” (Does not send this field at all).
Most of these fields are self-explanatory but some are worth noting. One is the URL field which is the domain name for the site. By default this is created when the Shopify account is created. The “IsActive” checkbox tells the program that this is an active site that we want to send information to. The next option is the “View” setting this will have to be the name of the Database View that is used and is where the program examines and ultimately sends the data to the website.
The Webstore field is the store ID of whichever store we wish to send inventory from and to the site. I will go through the mandatory fields for this view later in this manual. The Program also has an option to send inventory from multiple Store IDs. The webproduct field is the flag we are using to tie the products into the set. In the case of the screenshot any product IDs with the webproduct column set to 1 are considered products that should be sent to the site. The Field Location name is the name of the location that was created on the Shopify site. (This value will default to “Shopify” if there are no locations found). It is always a good idea to review with the customer and determine what fields they would like to send over to the site when setting this up.
The Shopify View:
In this next area I will begin to discuss the View. By default, we have a shopweb view with some options set. Depending on how the customer wants to send the data we can modify the structure of the view to accommodate this using SQL. By default we need information from multiple tables with the following names within the view.
Mandatory columns include the following:
· UPC (Known as SKU on the site),
· OriginalProductID(Should be productid in VRP),
· ProductID (Known as handle on the site can be a variation of the productid in VRP),
· Brand (could be Vendor or Brand columns in VRP),
· MG (known on the site as the Product Type),
· Color, (Variant Option 2)
· Size, (Variant Option 1)
· Wil, (Variant Option 3)
· Title or Description (can both be used to represent the product’s Title on the website. If both are present within the view, then Title will be the title on the site)
· LongDescription (Long Description on the site can be grabbed from Proddesc Table in VRP)
· Last Update (Comes from the Inventory table and will be used to see if there is an update needed for this UPC)
· Features (webproduct value from rpproducts table)
· Sizeorder (is the seq column from sizeseq table) is used to order the sizes that are sent to the website)
· Onhand (summary of the onhand for this upc)
· MSRP (The Compare at Price on the Shopify Site needed only if the option is enabled within the shopify set)
Aside from these, there are other fields that can be added depending on settings and information that needs to be sent from the website such as the weight column, Tags column, and CustomCollection column. Column data from the weights table (If the customer wants to send weight by upc) and the webmetatags table which can house and send Tags or any other data we want to the web.
Once the view has been set up and the API connection has been made, we can test the sync by making sure the Shopifyset is active and the settings to Update Products, Create Products, and Update Shopify are checked off. From there we can select a product and update its webproduct value to the flag we have set for the set (Most of the times this value will be 1).
Sending Images:
VRP can also send images to the website along with the product posting and data. To set this up we need to have the images on the Server running the Rpshopify.exe program or have the server have access to a cloud folder which houses the images. From here we need link images to products under the Matrix II module. We search for a product, click on zoom, and enter the area towards the right called “Image Links”. From here we can load the colors available for the product and attach the images. If the Shopifyset settings are to send images always or on creation, then the images will send when the product has been marked as a webproduct. Below are some screen shots demonstrating where to go for this.
Search for Product and Enter Zoom

Click on Images Links, load all Colors, and click URL to open windows file explorer to search for image to attach to this productid/color combination. Then click Save.

Once this is completed the Images will populate according to the product color combination on the website.
These are the essentials of setting up the integration between VRP and Shopify. There are other topics that can be expanded upon, but they depend on the customer needs.
Useful Links: